Showing posts with label appetizer. Show all posts

Thursday, August 28, 2014

Italian Sloppy Joes

I had leftover sloppy joe sauce in my fridge and I was trying to figure out what to do with it. I came across this idea from The Pioneer Woman. This worked perfectly to use up our leftovers but I think next time I'll use homemade spaghetti sauce instead.


I used white homemade garlic bread as the base which made it taste amazing. I just put some butter and garlic salt on the bread and put it under the broiler for a few minutes. Then, I topped with the meaty sloppy joe sauce and sprinkled some mozzarella cheese on top. Then I put it back under the broiler for a couple of minutes to let the cheese melt. It was a really quick meal. I think I'm going to work on freezing some homemade spaghetti sauce this week. My husband has been asking me to do it for months and it's just one of those things I haven't gotten around to. Maybe I'll do it over the holiday weekend since he'll be leaving me for a boys trip.


Tuesday, August 26, 2014

5 Minute Salsa

I have bought the ingredients for this salsa probably 5 times now and I always end up the using the ingredients for something else before I end up making it. This time, after I got home from the store I whipped it right up. It was quick and it tasted delicious. I found this recipe from Damn Delicious. You will need a blender.

I have just a small, cheap, two setting blender and when I dumped all the ingredients in there, it filled it to the very top. I was glad I could still get the lid on. If it doesn't all fit you can always blend it in batches and then return it all to the blender at the end and just pulse it for a second to mix it all together. One thing that scared me is that after I blended it, it looked more pink than red as you can see in the picture above. But, after about an hour in the fridge, it all soaked in and settled and it looked normal like the picture below.


 Ingredients:
2- 10oz cans diced tomatoes I used 5-6 medium tomatoes
 1 clove garlic
 1 small red onion, roughly chopped
 1 jalapeño, seeded and roughly chopped
1/2 cup fresh cilantro leaves
 1 lime, juiced
1 teaspoon sugar
Kosher salt and freshly ground black pepper, to taste
Tortilla chips, for serving

 Directions:
  • Combine diced tomatoes, garlic, onion, jalapeño, cilantro, lime juice, salt and pepper, to taste, in blender until smooth.
  • Serve with tortilla chips.


Tuesday, January 7, 2014

Creamy Tomato Soup and Grilled Cheese

After I had my baby a friend of mine brought me a warm round bread loaf straight out of the oven along with some tomato bisque soup from Trader Joe's. I'm not really a tomato person though. It's probably one of the only foods that I think tastes absolutely gross by itself, at least. So, tomato soup has never really tastes good to me. But she brought me this wonderful smelling warm bread and I needed something to dip it in. I warmed up the tomato soup and dipped the bread into it. It was delicious! I think I ate the whole box of soup in two days. Ever since then I have been craving tomato soup. I decided to make some this week. It is really simple and easy.

Ingredients:
2- 14oz cans Del Monte diced tomatoes with basil garlic and oregano
1 Cup chicken broth
1/4 Cup butter
2 Tbs sugar
2 Tbs onion, chopped
1/8 tsp baking soda
1.5 Cups heavy cream


Sautee the butter and onions in a large saucepan. Mix in the tomatoes, broth, sugar and baking soda. Turn heat down to low and simmer for 30 minutes. Heat cream separately and add to tomato mixture just before serving. Puree the tomato mixture for a smooth soup.

TIP: I poured my tomato mixture into my blender when it was still hot and I think because it was so full some of the hot tomato mixture flew out of the top and burned the palm of my hand as well as sprayed red tomato sauce all over the front of me and all over the kitchen. I was already having kind of a rough day so I was not very happy. I would recommend blending up half the tomato sauce in the blender at a time if you have a smaller blender like me. I ended up putting a kitchen towel over the lid on the blender and finishing the job. Other than this little hiccup, this recipe was really easy and tasted great as a leftover.

Now, when I think of tomato soup I always think of grilled cheese. In college I would go over to my husband's apartment for lunch sometimes and he would make grilled cheese and soup. 
Then, when my mother in law was staying with me after I had my baby she made my husband and I grilled cheese sandwiches for lunch one day. She added a little bit of cream cheese in the middle though which tasted so delicious!! 

Grilled cheese sandwiches are pretty simple just DON'T BURN THEM! They burn really quickly if you aren't paying close attention. 

Ingredients:
2 pieces sandwich bread
Butter
Cheese, sliced - I use Colby jack but it can be done with any cheese of your choice
Cream cheese

Directions: 
Put butter on both sides of sandwich bread. Any sandwich bread will do. Place your pieces of bread down on a pan over medium heat or you can make them on a griddle which is my favorite way. Then, add sliced cheese and cream cheese to the top of one piece of bread. After about 30 seconds put the piece of bread without cheese on it on top of the cheese with the toasted side facing out. Leave on the griddle until the cheese is melted, about a minute. Make sure not to burn the bottom. It's as simple as that.

Monday, December 2, 2013

Thanksgiving 2013

Thanksgiving this year was awesome! In June I was getting ready for this new baby of ours and I thought that we should pick a date for his baby blessing in church so that our family could mark their calendars. We decided to bless him on December 1st which would only be a few days after Thanksgiving. With that in mind, we decided to host Thanksgiving here in Huntington Beach. I was not sure how it was going to turn out at all. I've only cooked a turkey once before in college but that's pretty much it.

Thanksgiving morning I put the turkey in the oven roaster and started getting things ready.
I rubbed the outside of the turkey with olive oil and then I seasoned it with an Italian herb seasoning, fresh grated garlic, and salt and pepper. I chopped up half an onion, two carrots, and a celery stick and placed them inside the bird with Italian seasoning as well to keep the moisture in. Then, I cooked it in the roaster oven at 350 degrees for about 4.5 hours.

Mr. Tyrone carving the turkey

To make Thanksgiving fun for the kids I made a turkey vegetable tray and a turkey caramel apple dip. I got the idea for the vegetable tray from Eating with food allergies. Everyone loved it. They were also pretty simple too. Tyrone had to help me with the turkey face on the vegetable tray though. He's much better at artistic stuff than I am.


On the table I used wide wrapping paper that I had found at the dollar store. I had bought brown craft paper at the dollar store a while back but when I went to pick some up they didn't have anymore so I went with the most Thanksgiving looking wrapping paper they had. This was basically the only one that didn't have any sort of Christmas print on it. It worked fine. Then I bought a big roll of ribbon at Sam's Club to tie bows around the back of the chairs. Again, all they had was Christmas ribbon so I went with the most Thanksgiving looking one.


For the table settings I bought napkins at Bed Bath and Beyond. Then, I made some "Give Thanks" burlap napkin rings. I'm not really that good at crafts like this but they ended up turning out really nice. I had a hard time finding the charms to go on the napkin rings like the tutorial shows but I think that just the ribbon looked nice. I got the tutorial from two it yourself.
 
On each plate I placed a small treat bag filled with "acorns." I used a Hershey's kiss, a small nutter butter and a mini chocolate chip held together by peanut butter. I put 6 in each bag. My father in law loved them. He took all the ones that were left on the table and hid them in the bushes. This is not a joke. I'm glad they were a hit.


Overall I think it turned out great! The weather was gorgeous and it was so much fun to have everyone here in Huntington Beach. Our one bedroom apartment was quite squishy at times but no one complained and I think it was nice to have everyone so close. It's going to be hard to say goodbye to this little place. There are a lot of memories here.
The whole family!

Sunday, October 20, 2013

Olive Garden Bread sticks

My sister came to visit us last week and we had a lot of fun! She was supposed to come in September for her birthday but I ended up having a baby the day before her flight was scheduled so we had to postpone it. She comes to visit every summer and I absolutely love it. I always have a long list of things I want to do with her when she comes. This year was a little different since I had a little one but we still got to do quite a bit of stuff. We love to cook together when she comes into town so one of the first things we made was homemade chicken broccoli Alfredo. It was absolutely delicious. We decided to make homemade Olive Garden bread sticks to go with it. They take a little bit of time to rise but the preparation is pretty easy. I got the recipe from Moms Crazy Cooking

Unfortunately I didn't get a picture of the finished product. They were so delicious. I will have to make them again soon and take final pictures of them before they are all gone. 

Ingredients:

2 tbsp granulated sugar
3/4 tsp active dry yeast
1 cup; plus 1 tbsp warm water (105-115 degrees)
3 cups bread flour
1-1/2 tsp salt
1/4 cup butter, softened

(use for topping after baking)
2 tbsp butter, melted
1/2 tsp garlic salt

Dissolve the sugar and yeast in the warm water in a small bowl or measuring cup and let the mixture sit for about 5 minutes, or until it becomes foamy on top. If it doesn't get foamy, check to make sure your yeast isn't expired or the water wasn't too hot or too cold. This step is called proofing. If the mixture doesn't get foamy that means that the yeast didn't activate and the bread won't rise if you continue on.

Combine flour and salt in a large bowl. Use the paddle attachment on your stand mixer to mix in the softened butter to the flour. Don't worry if it still looks like flour, you just don't want to see lumps of butter.

Switch to your dough hook and add your foamy yeast mixture to the flour. Combine ingredients and then knead for 10 minutes.

Transfer dough to a lightly greased bowl and cover with a damp towel, let rise for 1 to 1 1/2 hours, it will double in size.

Once doubled, measure out portions to roll into bread sticks. The easiest way to roll is between your palms but you can also roll on the counter or a cutting board.  Place dough on a parchment lined baking sheet, or Pam sprayed baking sheet.

Once all dough is rolled, cover with a damp cloth and let rise for another hour to 1 1/2 hours. Until the dough doubles in size again.


Preheat oven to 400 degrees. Bake the bread sticks  for 12-14 minutes till golden brown. Remove from oven and add the garlic salt to the melted butter and then brush it over the bread sticks.

Makes 12-13 bread sticks.


We dipped these bread sticks in homemade Alfredo which was delicious! If you want the recipe to homemade Alfredo sauce go here

Saturday, September 28, 2013

Half White Half Wheat homemade bread

On Sunday night, two weeks ago, my husband wanted to make bread. Ever since he gave me my Bosch he wants to make bread with me all the time. I absolutely love it! It's so fun to be in the kitchen with him. We have made a few different types of bread now and I wanted to try something with wheat. We found this great recipe at Adventures in Bowersland. This recipe makes two large delicious loaves of bread. When we were baking these loaves we had to move the shelf down in the oven because they were touching the top when we checked on them.The great thing about wheat is it is very filling. One piece of toast and you feel full.


Ingredients:

4 cups whole wheat flour
4 cups white flour or bread flour
4 cups luke-warm water (115 degrees F)
1/3 cup honey
2 tsp active dry yeast
2 tsp sea salt
4 Tbsp butter
olive oil


Mix together 1 cup warm water with the honey and the yeast. Set it aside for about 10 minutes to activate. When the yeast mixture looks all bubbly, you know it is ready. In a large mixing bowl mix the yeast mixture with the other 3 cups of warm water and 4 cups of white or bread flour.  Add 1 cup of whole wheat flour and continue mixing. Stir until the lumps are all out and cover with a damp towel. Set it aside for 30 minutes. The dough will rise slightly.


While you wait melt the butter and set it aside. You want the butter to be cool before you add it to the mixture so it doesn't kill the yeast. Add the butter and salt to the mixture as well as the last 3 cups of whole wheat flour adding just a little at a time. Once you've mixed in all of the flour, roll the dough out onto a well floured surface or turn on med/high if mixing in your KitchenAid or Bosch. When the dough pulls off the side of the bowl you know it is ready. I ended up having to add about 2 cups more flour to get the dough the right consistency. You want to make sure it's not too sticky but you don't want to add too much flour or it will end up really dense. If kneading by hand, knead on a floured counter top for 10-15 minutes adding more flour as needed until it no longer sticks to the counter top. Once you are done kneading it, place some olive oil in a large mixing bowl and put the dough back into the bowl. Put a dash of olive oil on top of the dough and turn it a few times to cover it in oil. Place a damp towel over the bowl and let it rise for about an hour or until it is double in size.

Once it has risen, you can punch the center of the dough ball to get out all of the air bubbles. Cut the dough into two pieces and roll each piece out either on the counter top or in your hands to get the rest of the air bubbles out. Then, shape your dough balls into loaves. Place the dough balls into two greased bread pans. Cover the bread pans with a damp towel again and let it rise for 30-45 minutes. This is the last time, I promise!


Preheat your oven to 350 degrees while the dough is rising in the loaf pans. The dough should almost double in size. Bake for about 40 minutes or longer if you want a darker crust.


When the bread comes out of the oven, place the loaves on a cooling rack. I like to put mine on the side and then the cooling rack makes lines in the bread and they make perfect slices if you cut along them.

On a side note, the day after we baked this bread my water broke and our little baby decided that it was time to come. He came 4 weeks early. When we got home from the hospital 4 days later everything in our fridge was old and spoiled so this bread was awesome to have. We had amazing friends and family who helped us out with meals, cleaning, diapers, premie clothing, etc. I can't thank them enough! We love this new little bundle of joy!

Thursday, August 15, 2013

Homemade White Bread

30 weeks pregnant and look at Jackson's awesome surfboard that Tyrone painted. It's getting glassed and fins put in it right now!

I have been wanting a Bosch mixer for quite some time now but I just couldn't justify spending money to get it. But my birthday was coming up and my husband kept asking me what I wanted and I'd say something like, "What I really want is a Bosch mixer, but I know they're really expensive, so I don't know..." I just felt like it would be great to have but it was a lot of money. Well, being the amazing husband that he is, he along with my father in law pitched in together and they got me a Bosch mixer and I'll tell you, IT IS BEAUTIFUL!

 This means no more kneading dough myself. This means that it will no longer take me all day to bake bread or cinnamon rolls, or bread rolls. It's amazing!!It came in the mail the day we were leaving out of town though, sadly. I opened up a few things and read the manual but I didn't actually get it out and use it for the first time until last night. I think Tyrone was almost more excited than I was to use it. He kept on saying he wanted to make bread with me. Those are great words coming from his mouth!


I got all the parts washed and ready to go. I found this recipe on pinterest and it is delicious! We ate half a loaf when it came out of the oven. I put butter and homemade strawberry jam on mine. Tyrone wanted peanut butter and strawberry jam on his. It was so yummy! Joyful baker is where the recipe came from.

This recipe makes 2 loafs. After the first batch came out of the oven, Tyrone suggested to make another batch so we made 4 loafs total. Then after that he wanted to make cookies. Homemade bread and cookies for dinner. YUM!

Homemade white bread
2 cups hot water (out of the tap)
1/4 cup + 1 tbsp oil
1/4 cup + 1 tbsp honey
2 tsp salt
1/5 cup Powdered milk
2 1/3 cups flour (any combination of white and wheat - if mixing flours, start with white)
2 1/2 tsp saf-instant yeast
3 cups flour (any combination of white and wheat - if mixing flours, start with white)

 Combine ingredients in the order listed above in a stand-mixer bowl fitted with dough hook, saving the last 3 cups of flour to add later. After adding the yeast, turn mixer on and let ingredients combine slowly. Add the remaining 3 cups of flour, until the dough starts pulling off of the sides of the mixer. Turn mixer to high and knead for 8 minutes. Cover the bowl and allow the dough to rise for 20 minutes. Preheat oven to 150 degrees.

Once dough has risen, divide the dough into 2 even balls. Place on a floured surface and with your fingers, lightly press each ball into a rectangular shape about the length of a bread pan. Roll into loaves and place them seam side down in pans sprayed with cooking spray.

Place pans in oven and allow to rise for 20 minutes. Then raise the temperature to 350 degrees and bake for 25-30 minutes. Remove from oven. Then remove the bread from the pans and allow to cool slightly before slicing. I like to turn my loaves onto their side on the cooling rack. This makes lines in the side of the bread and then you have perfectly even slices when you are ready to cut it.

This bread is great for toast or sandwiches. It is delicious!


I am so excited about my new kitchen gadget. Homemade bread is now a piece of cake.


Thursday, July 25, 2013

Potstickers


Tyrone and I took a trip to New York in January and while we were there we ate at this delicious restaurant in China town. I can't even tell you the name of it because it was in Chinese. Some friends of ours took us there and told us that the potstickers were the best. They told us what to order because again, nothing was really in English. I was shocked with how yummy they were. Ever since then, I have been craving them. 
Recently, we went out to lunch with some friends to a Japanese restaurant and they had gyoza, which I found out is basically the same thing as a potsticker. Then there are dumplings, which are yummy as well, dumplings are made the same way as a potstickers but they are steamed or boiled rather than fried.  I prefer the fried because I like the crunchy outside. Both are very delicious though, it just depends on preference. 

I decided to try and master potstickers yesterday afternoon. I knew it was going to be a lot of work so I was hoping that they would turn out yummy. They did! Sometimes I'll try really complicated recipes that take all day only to have it flop in the end. Those are disappointing days because I have nothing to show for and nothing to serve for dinner. These potstickers take a lot of work but they are not too difficult. If I can do it I think almost anyone can. 

I decided to make the potstickers homemade, from the filling to the wraps. The wraps do take a lot of time, but they really aren't that difficult. I learned how to make the potstickers from Use Real Butter

She has great pictures and descriptions. I would check out her page if you get a chance. She goes into much greater detail than I'm going to. I'm just going to go over the main parts. 

On Use Real Butter she has a recipe for a shrimp filling as well if you would rather do that instead. I used the pork filling so that's the only one I've posted on here.

Pork filling: 
1 lb ground pork
4 large napa cabbage leaves, minced
3 stalks green onions, minced
7 shitake mushrooms, minced (if dried – rehydrated and rinsed carefully)
1/2 cup bamboo shoots, minced
1/4 cup ginger root, minced
3 tbsp soy sauce
2 tbsp sesame oil
2 tbsp corn starch


The most time consuming thing of this entire process is chopping up all of these ingredients. Everything needs to be really small.

For the dough: 
4 cups flour
1 cup water
This will be enough for the filling recipe made with 1 lb of pork meat.
Mix the dough until it is smooth but firm. I had to add a little bit more water at a time until the dough stayed together. Depending on the climate you are cooking this in, the water amount could change as well. 
 Form the dough into a ball. Cut the ball into 4 even pieces. Take those 4 pieces and roll them out length wise into 1 1/4 in diameter. Then cut the rolls into 3/4 in pieces. Below are my 3/4 in pieces smashed into round balls. Now, I am no expert in rolling out dough. My round pieces are not perfectly round, as you can see, but they worked. They also recommended to roll the edges thinner and leave the middle thicker but I skipped that. I just rolled them out and they worked fine. I didn't have any problems with them tearing.


I was surprised with how good the wrapping turned out. If mine can look like this I'm sure yours will be much better.
Make sure you go to Use Real Butter to find out how to pleat the edges of your potstickers. She does a great job of explaining how to do it with pictures.

Now that you've made the delicious potstickers, lets cook them.
If making potstickers, heat up about 2-3 tbsp of oil in the bottom of a large, deep non-stick frying pan on medium- high heat. Cook the potstickers until the bottom of them turn a golden brown. Once the bottom is a golden brown, quickly pour 1/2 cup of water into the pan all at once. Make sure to stand back as you do this, the oil will want to pop everywhere. Then, immediately put on the lid and keep covered until all the water has cooked out. When the water has cooked out, take off the lid and turn the temperature to low-medium heat and cook for an additional 2-3 minutes.

If making dumplings instead of potstickers, bring a large pot of water to a boil, place dumplings into the pot. When the dumplings float, they are done. Simple enough, right?

Dipping Sauce:
1/4 cup soy sauce
1/8 cup red wine vinegar
a few drops of sesame oil
1 tsp minced garlic

This is what I used for the dipping sauce. There are a lot of varieties you could use.

some optional additions for the dipping sauce would be:
minced green onions
chili garlic paste
sugar
minced ginger

Here is the guinea pig enjoying his potstickers


Sunday, July 21, 2013

Three Ingredient Fruit Dip


 I've made this fruit dip a few times now and it is absolutely amazing. Every time I have made it, it's gone in an instant. I'm not a huge fan of fruit dip to be honest but after eating this one, I have definitely changed my mind. The best part about it is that it is so easy and there are only 3 ingredients all of which I usually have on hand. 

I bought 5 cartons of strawberries at the store this week in anticipation to dip every single one of them into this mouth watering dip. Well maybe not all of them, but a lot of them. Tyrone came home one day and looked in the fridge and asked, why do we have so many strawberries. My response was, "to eat them, duh!" But in reality they were on sale for 88 cents so I figured I would stock up and whatever we didn't eat I would freeze and make yummy smoothies with. 

Ingredients: 
1-8oz package of cream cheese
3/4 cup brown sugar
1 1/4 tsp vanilla extract 

That's it. I put all of the ingredients in a mixing bowl and mixed it with beaters until the dip was smooth. You don't want the sugar to be grainy. I tried originally to mix it with a fork and that didn't go so well. As long as you use a mixer, the cream cheese will mix right in with everything else and then it tastes great cold. 


Tuesday, May 28, 2013

Naan

My husband lived in India for two years and he loves Indian food. Since we started dating I have begun to love Indian food as well. My favorite dish is something called masala dosa. It's this thin pancake like outside with potatoes and spices and vegetables on the inside and they roll it up into a burrito looking roll. It is to die for. Usually when we want real Indian food we go to this place in Artesia, CA called little India. It has Indian restaurants, jewelry stores, clothing stores, grocery stores, everything you can think of. It is a fun place to spend the day. 

So, to try and be a good wife I decided to try and make me some Indian dishes. One of my clients at work bought me a cookbook called The Complete Book of INDIAN COOKING by Shehzad Husain & Rafi Fernandez. I tried a simple cashew curry recipe and a naan recipe. The cashew curry recipe turned out awful. Tyrone said it was the worst curry he's ever had in his life. He said he was joking but it was definitely the worst I have ever had so it probably had a lot of truth to it. All I could taste in the sauce was onions. It needed more flavor of some sort. I did sort of redeem myself with the naan though. 

I am not very good at making bread so I just assumed that this would be a fun experiment but I was happy to find out that it was absolutely delicious and relatively easy. This recipe made about 9 large pieces of naan. We broke off pieces of the bread and dipped it in hummus. It was all gone in just 2 days. We really enjoyed it. 

Ingredients: 
2 tsp dried active yeast
4 tbsp warm milk
2 tsp sugar
4 cups plain (all-purpose) flour
1 tsp baking powder
1/2 tsp salt
2/3 cup milk
2/3 cup natural (plain) yogurt, beaten
1 egg, beaten
2 tbsp ghee, melted 
flour, for dusting
chopped fresh coriander (cilantro) and onion seeds, to sprinkle 


I had no idea what ghee is so I substituted ghee for margarine. I looked up ghee and it looks like you can buy it in the stores or you can make it yourself by heating up butter on the stove and taking off the foam layer and then straining the butter through 2 or 3 cheese cloths. I decided just to go with butter since it was all I had and it turned out fine.


1. Mix the yeast, warm milk and sugar and leave to become frothy. Sift together the flour, baking powder and salt. Make a well in the centre and add the yeast mixture, milk, yogurt, egg and ghee. Fold in all the ingredients.

2. Knead the dough well. Tightly cover the bowl and keep in a warm place until the dough doubles in size. To test, push a finger into the dough-it should spring back. Preheat the oen to 400 F. Roll out the dough on a floured surface.

3. Make each naan slipper-shaped, about 10 in long and about 6 in wide, tapering to 2 in. Sprinkle with the coriander and onion seeds, ( I didn't put an seasoning on it but I would imagine that garlic would taste good on it as well.) Place on greased trays and bake in the preheated oven for 10-12 minutes.


Thursday, January 3, 2013

Potato Wedges

I have been making these potato wedges for the last two nights and they are delicious! I don't know why I haven't made them before. They are so simple. I have been trying to use up the rest of my potatoes because I bought way too many. I am finally on my last bag. I have to say this is probably one of the best ways I have prepared them thus far.

I got the recipe from Oh So Delicioso 

Ingredients: 

Fries: 
4-6 Potatoes
1/4 cup olive oil
Sea Salt, Fresh ground pepper, your favorite seasoning salt
Sour Cream/Ranch Sauce:
1 cup sour cream
1/2 cup ranch dressing 
1/4 cup milk
 
Toppings: 
1 cup (or as much as you like) Shredded cheddar cheese
1/2 cup shredded mozzarella cheese
1/2 cup real bacon bits
1/4 cup green onions
 
Instructions
Cut potatoes into "steak french fries" size. 
Place on foiled baking sheet. 
Drizzle with olive oil and lightly toss with tongs. 
Sprinkle salts and pepper over the potatoes. (I used garlic salt and pepper the second time and my husband loved it.)
 Bake 400 for 40 minutes or until fork tender
 
In a seperate bowl mix:
 sour cream, Ranch dressing and milk.
On a separate platter smooth out 3/4 of the sour cream sauce.
place hot potatoes on sour cream sauce. (I did this the first time I made then, but I didn't really like it. There was just too much sauce on the bottom fries. The second time, I just put them on a platter, melted the cheese and drizzled the ranch sauce on top. It was much better and I didn't feel like they were drowning.)
drizzle remaining sour cream sauce on potatoes
Sprinkle toppings. 
Place under broiler for a few seconds to re-melt cheese.

The fries taste really good without the cheese and ranch sauce on them as well. I had a few right out of the oven with nothing on it and I was impressed. They would be a great side to make for summer barbecues.

Wednesday, November 28, 2012

Crock pot potato soup

Happy late Thanksgiving! I 'm a little late I know. Since we traveled to Arizona to celebrate Thanksgiving  this year, I didn't make anything for dinner. Last year I made a pecan pie and brought it but this year I had too many things going on. I did however buy three, 10 pound bags of potatoes. They were on sale for 99cents each. The question now is what to do with them all. So, I decided to try one of the many crock pot soup recipes I've been looking at. I tried this recipe from Hannah.  It was so easy and delicious. It does make a lot of leftovers though. I would recommend cutting the recipe in half if you are making it for two.

Loaded Baked Potato Soup

Ingredients:
5 pounds russet potatoes, diced, NOT Peeled
5 Tbsp TS Garlic Garlic  (I don't have garlic garlic so I used 2 Tbsp Garlic salt and 1 Tbsp garlic powder)
1 large onion, chopped
64 oz chicken broth or stock
16 oz cream cheese
bacon, sour cream, chives, or shredded cheese for toppings

Directions:
Combine first 4 ingredients in your crock pot, cook on low for 8 hours or on high for 5. Purée soup in food processor with cream cheese. (I don't have a food processor and I didn't want to use a blender so I just put the cream cheese into the crock pot and used a hand mixer. It worked great. It left a few chunks but I thought it tasted really good that way.) Serve warm topped with bacon, sour cream, shredded cheese & chives.

This recipe is pretty easy and it tastes really yummy. I was happy to find a way to use 5 of the 30 pounds of potatoes I bought.


Friday, November 2, 2012

Bow Tie Themed Baby Shower


I helped throw my first baby shower a couple of weeks ago. It was awesome. There were about 5 girls that all pitched in to help throw it. I think it turned out adorable. We had a bow tie theme. My friend Wendi made the invitations that were so darling. I meant to take a picture of my invitation but I forgot. But, you can order them here if you would like. I made baby bow tie onesies to match the gray, blue and red invitation color scheme and my friend Alicia pinned them and turned them into a banner to hang over the mantle. I made small bowties out of felt. I just used a hot glue gun. Then I sewed one snap onto the onesie and hot glued the other snap onto the bow. That way, you can unsnap the bowtie and throw the onesie in the wash. They were really simple and easy to  make. I think I might try to make more using cute fabric next time. I'll let you know how that goes.
For the food, Wendi made the food labels with the same bow tie scheme. We had, blue frothy punch, pineapple and strawberry mini skewers with fruit dip, vegetables with hummus, blue and red cupcakes and water bottles with cute bow tie paper around them. My friend Christi also made the bow tie back drop behind the table. Sorry the pictures aren't very good. There was a lot of light coming through that window. I made the fruit skewers and the fruit dip as well as the blue frothy punch. I had bought white ducks to float in the punch and I had made mini bow ties and hot glued it on their necks, but they fell off. I should have used super glue. So, we had a duckless punch. 

Here is the recipe: 
 1 pkg berry blue unsweetened Kool-Aid
 1-2 liter Sprite
 1-64 oz white cranberry juice
 8 scoops vanilla ice cream
 1 c sugar, or to taste 
 In a large punch bowl, stir together the Kool-Aid, Sprite and cranberry juice. Stir in sugar to taste. (I used the full cup) Float scoops of ice cream on the top. The ice cream melts somewhat and turns the punch a beautiful baby blue color with frothy white clouds floating on the top.

The night before the baby shower I was lying in bed and I thought,  I should probably stick the sprite and cranberry juice in the refrigerator. I would recommend this. The ice cream still made the punch frothy with the liquids already cold. 

The fruit dip for the pineapple and strawberries was to die for! A friend of mine gave me the recipe in a text. That's how easy it is. She said that it is best with pineapples and strawberries so that's what I got but I also tried bananas and it was good with that as well. 

Ingredients: 
Mother's macaroons
2 cups greek yogurt or sour cream
2 cups brown sugar

I made mine with greek yogurt and it was really yummy. Mix two cups of the greek yogurt or sour cream with two cups of brown sugar. Add crumbled cookie pieces. Chill and serve. I doubled my recipe and still only used half of the macaroons. It's up to you how much macaroons you would like to put in. And viola! 

 
I think it was a successful baby shower. It's always fun to buy or make cute baby things. They are so precious. I wish Crystal and John the best of luck with their new baby Thor.

Friday, August 3, 2012

Chicken Avocado Quinoa salad

I have been wanting to use quinoa for a while now but I just couldn't find the right recipe. But, I finally came across this one and it was delicious! I love quinoa! It is a great substitute for rice and it is one of the only grains that is a complete protein. Quinoa does have a high fat content and so it is advised to keep it in the refrigerator or freezer instead of on the shelf to keep it from going rancid. But, the fat is "good fat," not unsaturaded or trans fat. Now that I've basically given you a lesson on quinoa, lets get to the recipe.

Ingredients:
1 cup quinoa, cooked and cooled
½ onion, chopped
1 (15 oz) can black beans, drained and rinsed
2 ears of corn, grilled and removed from cob (or 1 small can niblets)
1 cup shredded chicken
1 large avocado
4 limes
¾ cup fresh cilantro
2 ½ Tbsp agave (sugar works ok too)

I like to cook quinoa in chicken broth. It gives it a little bit more flavor. When cooking quinoa, some people suggest to rinse it, I don't. It usually comes pre-rinsed but some people like to soak it anyway. When cooking quinoa it's good to know that 1 cup raw quinoa makes about 3 cups of cooked quinoa. To make three cups of cooked quinoa, place one cup raw quinoa and 1.5 cups cold water or chicken broth. Bring the quiona to a boil. Cover with a tight fitting lid, and turn down to a simmer. Let cook for 15 minutes. Remove from the heat. Let quinoa sit for 5 minutes with the lid on. Fluff gently with a fork and it's ready to go.


Directions:
1) In a large bowl, mix onion, black beans, corn, chicken and quinoa together.
2) In a blender, combine the lime juice, cilantro and agave to make the dressing.
3) Cut the avocado in small pieces and toss in dressing. Add avocado to quinoa mixture.
4) Pour dressing over quinoa mixture and toss to combine. Sprinkle with sea salt.


Wednesday, August 1, 2012

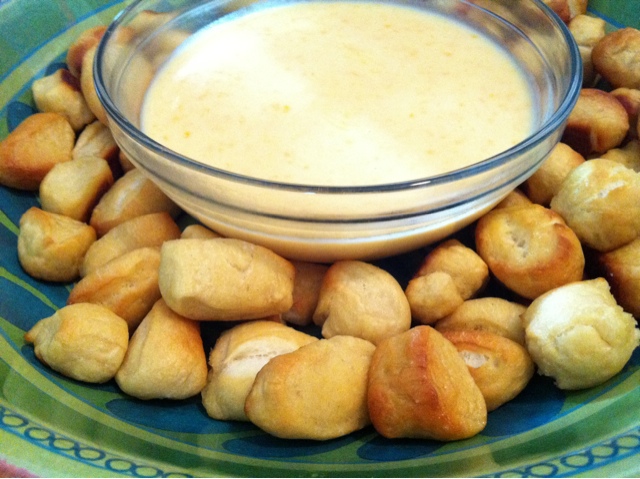
Pretzel bites


My sister flew into town this week and I was asking her what she wanted to do besides go to the beach and get a tan. She told me that she wanted to do some cooking. I was a little shocked but also excited because there are so many recipes that I want to try but I know that there is a lot of work involved so I keep pushing them aside. So, the first thing we attempted were pretzel bites. I did not expect them to turn out this good but let me tell you, they were amazing! This recipe is more for a party of people though. We are going to have pretzel bites for months. When my neighbors came home I met them on their doorstop and offered them some pretzel bites. It was kind of weird, I know, but they loved them and they took some more off of my hands. 
I got this recipe from Smells Like Home

Ingredients:

  • 1 1/2 cups warm (110 to 115 degrees F) water
  • 1 tbsp sugar
  • 2 tsp kosher salt
  • 2 1/4 tsp instant yeast
  • 22 ounces all-purpose flour, approximately 4 1/2 cups
  • 2 ounces unsalted butter, melted
  • Vegetable oil
  • 10 cups water
  • 2/3 cup baking soda
  • 2 tbsp butter, melted
  • Pretzel or Kosher salt

Directions:
1. In the bowl of a stand mixer fitted with the paddle attachment, mix together the water, sugar, yeast, and salt on low speed for 10 seconds.  Switch to the dough hook and add the flour and butter.  Mix on low speed until well combined. Change to medium speed and knead until the dough is smooth and pulls away from the side of the bowl, approximately 4 to 5 minutes. Remove the dough from the bowl and transfer it to a well-oiled bowl. Cover the bowl tightly with plastic wrap and set it in a warm place for approximately 50 to 55 minutes or until the dough has doubled in size.
 
2. Preheat the oven to 425 degrees F. Line 2 large baking sheets with parchment paper. Set aside.
3. Bring the 10 cups of water and the baking soda to a rolling boil in an wide 8-quart saucepan or roasting pan
4. In the meantime, turn the dough out onto a slightly oiled work surface and divide into 8 equal pieces. Roll out each piece of dough into a 24-inch rope. Slice each rope into 1-inch pieces.  Place a lightly damp towel over the pretzel pieces to prevent them from drying out while you roll and cut the other pieces.
 
5. Using a slotted spoon lower a handful of the pretzel pieces into the boiling water and boil them for 30 seconds, flipping them around in the water with the spoon a couple of times. Remove the pretzel pieces from the water using the spoon, drain as best you can, and place them on the baking sheets. Brush the top of each pretzel with the melted butter and sprinkle with the pretzel/Kosher salt. Bake until dark golden brown in color, approximately 10 – 12 minutes. Brush with remaining melted butter before serving. Serve warm

 Instead of brushing the pretzels with melted butter, I used "I can't believe its not butter" spray. It was a lot quicker and easier.


Tuesday, July 17, 2012

Split Pea Soup and Food Storage

I have finally decided that I should start a food storage. I live in a very small apartment but I figured I needed to do it anyway. So, last week I went to a food storage cooking class on how to cook with dehydrated carrots and onions. It was an amazing class. The teacher was awesome! I learned so  much from her. She said that she has a coffee grinder that she uses to grind up the dehydrated onions into onion powder and she grinds up the carrots as well. She says she uses the carrot powder to thicken things up like spaghetti sauce. What a great idea! I would have never thought of that. Then, she gave this great recipe for split pea soup. It is a green soup and it looked more like salsa than soup to me, but it tasted amazing. So, I made it this week. It has ham in it as well, so I got to use  more of the honey baked ham leftovers in my freezer. YAY! I'm trying to use it up any way that I can.


If using dehydrated onions or carrots, rehydrate them before using them. The ratio for re-hydrating is 2:1. Two cups of water for every one cup of carrots/onions.


Split pea soup

Ingredients:
1lb split peas (You can find these next to the beans and rice)
1tbs. olive oil
1 c. onions
1 c. carrots
1 stalk celery (optional)
4 c. chicken or vegetable stock
4 c. water
8 oz. lean ham, finely chopped
1/4 tsp. thyme
1.4 tsp. marjoram
1 bay leaf
salt and pepper to taste

Directions:
Rinse peas under running water. Put into large saucepan and cover generously with water. Bring to a boil and boil 3 minutes, skimming off surface foam. Drain.

Heat oil in soup pot over medium heat. Add onions, and cook 3-4 minutes, stirring occasionally until softened. Add carrots and celery and continue cooking 2 minutes. Add the peas, pour in stock and water and stir to combine.

Bring just to a boil and stir in ham. Add Thyme, marjoram and bay leaf. Reduce heat, cover and cook gently 1-2 hours until ingredients are very soft. Remove bay leaf and serve.

Make sure not to add the salt and pepper until the soup is done cooking. If you add the pepper before it cooks for the 1-2 hours, it will end up tasting bitter.

Saturday, June 16, 2012

Edamame

 
I had no idea what edamame was until about a year ago. Tyrone and I went to a sushi restaurant called Ra. I don't particularly like sushi but I figured for his birthday I would suck it up. I do like tempura but I just don't like the raw fish stuff.  But, one amazing thing came out of this dinner. Their edamame! It was delicious. Tyrone wanted to order it and I was somewhat opposed to it. But he ordered it and I pretty much ate the whole thing myself. It was amazing. 
Then, last weekend  Tyrone and I went out to sushi again with some friends and they ordered edamame. I have been craving it ever since. So, on Monday, I went to the store and bought some. It was so easy to make and so delicious. Edamame has enough flavor by itself that I tried one right out of the strainer in the kitchen sink and then I kept eating them. I had to stop myself. I was going to eat them all without even seasoning them. Any way, onto the recipe. It is so simple. 

Ingredients: 
1 16oz package frozen edamame
sea salt
3 cloves garlic
2 tbsp olive oil

Directions: 
Boil edamame according to package. Then drain and set aside. Heat oil in large skillet. Smash 3 cloves of garlic and take off the outer layer but make sure to leave them in one piece. Place them in the pan along with the edamame. Cook until the edamame starts to brown. Then sprinkle with sea salt and serve. Estimated eating time is about 5 minutes. They are gone in a flash!
Hope you enjoy it as much as we did.

Friday, June 1, 2012

Clam Chowder

 
I made homemade clam chowder. I thought it was going to be really difficult but it was the exact opposite. It only took about 30 minutes to make and it was so delicious! It was nice to use up the rest of our clams too. With this recipe, I substituted one can of clams for a handful of cut up clams that we had cooked on the grill the night before. This is going to be one of my new favorites!

I got the recipe from Grumpy's

Just F.Y.I. The canned clams and clam juice can be found next to the tuna fish at the grocery store. I always have a hard time finding ingredients I've never used before. Hopefully that helps.

Ingredients: 
4 slices bacon, diced
1 small onion, chopped
1 stalks celery, chopped
Old Bay Seasoning (1 tsp. or to taste)
(There is a picture of Old Bay Seasoning below. I had a hard time finding it. Maybe this will help.)
2 cups diced potatoes
1 bottle (8 ounces) clam juice
1 teaspoon salt
1/4 teaspoon pepper
2 cans (approximately 7 ounces each) minced clams
(I used 1 can of minced clams and one handful of chopped cooked clams)
3 tablespoons flour
2 cups half-and-half
1 cup milk

Directions:
Cook bacon until crisp in a Dutch oven or large, heavy saucepan. Remove bacon to paper towels; drain. Remove most of the bacon grease from pan. Add onion and celery to bacon drippings; saute until softened. Add Old Bay Seasoning and cook and stir another minute. Add potatoes and clam juice, salt, and pepper. Cover and simmer for about 15 minutes, or until potatoes are tender. Remove from heat. Add minced clams with their liquid. Whisk flour into milk; add to chowder with half-and-half. Cook over medium heat, stirring constantly, until clam chowder thickens and bubbles, or about 3 minutes.Sprinkle with crumbled bacon and enjoy!