Wednesday, December 18, 2013

Pinto Beans and Polska Kielbasa

We are finally moved in. It was a three day process but it's finally done. The movers came and packed up our apartment one day, loaded the truck the next, and delivered all of our stuff at our new place the third day. But, on top of the craziness of moving, I got the flu the day they unloaded the truck. I hadn't been feeling well all morning but I really wanted to get as much unpacked and organized as I could. Finally I really thought I was going to hurl so I laid on the couch, which luckily came off the truck first, and I tried to take a nap. Then, sure enough, just after the movers left, I was sick all day. Great way to break in the new place right?

Luckily it was just a one day thing. I was able to unpack a little bit more the next day and go to Tyrone's holiday party. After the holiday party we headed back to our old apartment to pick up the last of our things that the moving company couldn't take for us and then we headed home. We didn't get home until about 12:30am. We were exhausted.

Then, Sunday after church Tyrone was dying for a home cooked meal because we had eaten out for almost a week straight. I looked in the cupboards and they were completely full but there was nothing in there to make a meal out of. All that was in the fridge was condiments, bottled water, and left over taco meat from Tyrone's work party. To make things simple we had left over taco meat on rice. It worked. That night we were dying for real food. But, with an empty fridge it was hard to make anything. We sadly ate junk food and went to bed.  

On Monday morning I HAD to go to the grocery store! That was the number one priority. I had to at least get the basic necessities. I found Polska Kielbasa on sale that I ended up snagging. I used it that night in a super easy recipe. My house was still not quite put together so I was trying to do a quick, hearty but easy meal. This was a hit. It was great as a left over too. 

,


Ingredients:
1- 16oz bag of pinto beans
8 cups water
1 jar salsa (I used chunky. You could use picante sauce as well)
1 polska kielbasa link, cut into small circles
1 green bell pepper, chopped
1 onion, chopped (optional)
cheese, (optional)

Directions: 
Rinse beans, taking out the rocks and misshaped beans. Place beans along with the water and salsa into the crock pot. Cook on low for 8 hours. Place the Polska Kielbasa, green pepper, and onion into the crock pot for the last hour to cook . Top with cheese if desired.
 

Monday, December 2, 2013

Thanksgiving 2013

Thanksgiving this year was awesome! In June I was getting ready for this new baby of ours and I thought that we should pick a date for his baby blessing in church so that our family could mark their calendars. We decided to bless him on December 1st which would only be a few days after Thanksgiving. With that in mind, we decided to host Thanksgiving here in Huntington Beach. I was not sure how it was going to turn out at all. I've only cooked a turkey once before in college but that's pretty much it.

Thanksgiving morning I put the turkey in the oven roaster and started getting things ready.
I rubbed the outside of the turkey with olive oil and then I seasoned it with an Italian herb seasoning, fresh grated garlic, and salt and pepper. I chopped up half an onion, two carrots, and a celery stick and placed them inside the bird with Italian seasoning as well to keep the moisture in. Then, I cooked it in the roaster oven at 350 degrees for about 4.5 hours.

Mr. Tyrone carving the turkey

To make Thanksgiving fun for the kids I made a turkey vegetable tray and a turkey caramel apple dip. I got the idea for the vegetable tray from Eating with food allergies. Everyone loved it. They were also pretty simple too. Tyrone had to help me with the turkey face on the vegetable tray though. He's much better at artistic stuff than I am.


On the table I used wide wrapping paper that I had found at the dollar store. I had bought brown craft paper at the dollar store a while back but when I went to pick some up they didn't have anymore so I went with the most Thanksgiving looking wrapping paper they had. This was basically the only one that didn't have any sort of Christmas print on it. It worked fine. Then I bought a big roll of ribbon at Sam's Club to tie bows around the back of the chairs. Again, all they had was Christmas ribbon so I went with the most Thanksgiving looking one.


For the table settings I bought napkins at Bed Bath and Beyond. Then, I made some "Give Thanks" burlap napkin rings. I'm not really that good at crafts like this but they ended up turning out really nice. I had a hard time finding the charms to go on the napkin rings like the tutorial shows but I think that just the ribbon looked nice. I got the tutorial from two it yourself.
 
On each plate I placed a small treat bag filled with "acorns." I used a Hershey's kiss, a small nutter butter and a mini chocolate chip held together by peanut butter. I put 6 in each bag. My father in law loved them. He took all the ones that were left on the table and hid them in the bushes. This is not a joke. I'm glad they were a hit.


Overall I think it turned out great! The weather was gorgeous and it was so much fun to have everyone here in Huntington Beach. Our one bedroom apartment was quite squishy at times but no one complained and I think it was nice to have everyone so close. It's going to be hard to say goodbye to this little place. There are a lot of memories here.
The whole family!

Friday, November 22, 2013

Goodbye Huntington Beach

We are moving!! It still feels unreal but we signed the lease today. I guess it's official. In just a few weeks we will no longer be Huntington Beach residents. We are so excited for the adventures that lie ahead but we are sad for the friends that we will be leaving behind.We are only going to be a few hours away though so it's not the end of the world.
Jacks loves the sun. He's going to be natural beach bum I already know it.

In June Tyrone got a promotion that we were so excited about since I was already five months pregnant. It was definitely a blessing. He has worked really hard and he deserved it. Then, in September he got offered another promotion to be a district manager down in San Diego. It took us both by surprise but we decided to take it. Tyrone started November 1st and he has been commuting every day. I don't know how he does it. It usually takes him about 3 hours to get home after he's done with work. I can't even imagine. But, it's working and we only have about another week left of it and then we can move down there.
I love that we can go to the beach in November here in So Cal


I am so excited about our new place. For those of you who don't know we live in a one bedroom one bath apartment. It's about 550 square feet. Boy is it cozy! We've lived here for just over three years now. The landlord here is amazing and we live just a short three blocks to the beach. You get what you pay for right? We are pretty squished in this little place but we managed to make room for a new baby in here so I can't complain too much. Instead of a baby's room we have a baby's wall.
Tyrone painted our little guy a surf board. It was just a foam board but after he finished painting it, he decided we should get it glassed and get some fins put on it so we could ride it. It turned out awesome! Let's just say other than this picture the board doesn't really hang on the wall like it was meant to. It goes out into the water a lot. Tyrone is just breaking it in until Jacks can ride it.

We took Jacks to the beach when he was just 5 days old

In our new place we have two bedrooms and two bathrooms. Wahoo!! We also have a dishwasher and a washer and dryer in the unit. I had never lived without a dishwasher until I got married. Dishes are by far my least favorite chore. I will do laundry all day, but dishes are just messy and stinky and they are never done! I'm excited about the washer and dryer too. We live in an upstairs apartment right now and I don't really enjoy carrying my laundry up and down the stairs to do it. I also dislike having to go and get quarters. It seems like every time I go to do the laundry I'm out of quarters. Especially now that I have a little guy I feel like I am doing laundry all the time.

Our new place is now 8 blocks from the beach. It is going to be rough to get used to but I'm sure we can manage. I'm glad that his new position is still here in Southern California so that we can continue to live the beach bum life. It is going to be hard to move away from here someday. Maybe we never will, who knows.

As far as my job goes, I went into work today and told them that I won't be coming back because we are moving. I am looking to transfer down to the San Diego area though so that I can teach fitness classes down there. We will see what happens. It would be nice to at least teach once a week to get out of the house and to keep me in shape. I am just 6 pounds over my pre-baby weight. Not too bad eh? What I weighed right before I had the baby was my weight in college. Pretty crazy. It feels good to be active again.

If anyone knows of fun things to do or places to check out in San Diego, let me know. I am excited for this new adventure and I am looking forward to exploring a new city.

Thursday, November 14, 2013

Butterbeer


Last year right before Halloween I got the opportunity to go to Florida with my parents for a week. My dad has been a vendor at the World paintball tournament in Orlando for close to 15 years and my mom and I have never gone. My dad was trying to convince my mom to go and she wasn't interested. So, my dad called me and asked if I wanted to go hoping that if I would go then my mom would go too. Of course I wanted to go! And, needless to say, my mom came too.


My mom and I had so much fun. We went to a different theme park almost every day. My mom wanted to ride every ride in each park we went to. She is a thrill seeker!


Disney World's Magic Kingdom

Disney's Epcot


Disney's Hollywood Studios


Universal Studios


We went to Disney's Epcot theme park, Hollywood Studios, Magic Kingdom, Universal Studios, and Universal's Islands of Adventure where we saw the Wizarding World of Harry Potter!! I was in heaven! I absolutely love Harry Potter. I totally had a crush on him growing up. One thing I knew I wanted to get while we were there was butterbeer. They had stands all over but the lines were extremely long. Finally I just had to jump in line and wait. Totally worth it. It was so yummy and delicious. The best way to describe it is like a butterscotch root beer float. My mom enjoyed it too. I got the souvenir cup so that I could try to recreate it when I got home.

Universal Studios Islands of Adventure


I really wanted to make Butterbeer this year before Halloween but, as life goes, time got away from me and I never got a chance to make it until after. The main reason why I didn't make it was because I could not find butterscotch flavored syrup. I thought for sure Smart and Final would have it but they didn't. They had probably close to a hundred different flavors, but no butterscotch. Finally, I decided to just order it online. I ordered it at 3pm and it was on my doorstep at 2pm the next day. I ordered through the Torani website. I was very impressed. I got the recipe from Iheartnaptime

The recipe from iheartnaptime makes about three to four 8oz glasses. My blender is too small for the recipe she gives so I had to modify it a little.

Ingredients:
0.75 quart vanilla ice cream
Just less than 1/4 cup butterscotch syrup
 24 oz (3 cups) cream soda 
1/2 cup ice

Directions: Put ice cream, butterscotch, cream soda and ice into blender. Mix until combined. Top with whipped cream if desired.

Monday, November 11, 2013

Crocheted Baby Beanie


I have been branching out a little bit on my crocheting lately and I was so proud of myself for making this beanie. The video I followed said that it was for a 3mo. baby but it fits my little 1.5mo old. He fits into other 3 mo. beanies though so maybe he just has a big head. This beanie was surprisingly quite easy once I got the first 4 or 5 rounds done. As long as you know the basics of crocheting you can follow the same video I did. Good luck. If you make one I'd love to see it.

Supplies:
3 or 4 ply yarn
G-4.25MM crochet hook


Here is the beanie tutorial and ear flap tutorial

Tuesday, November 5, 2013

Baby Bibs

I have been wanting to make baby bibs for a while but I just haven't been brave enough to try it. I finally decided it was time when my husband's cousin was pregnant with a baby girl and I got invited to her baby shower. All of the tutorials online say to use chenille as the back fabric for the bibs but no matter what fabric store I went to, they did not have it. I have used the terry cloth from Joann's before for burp cloths but I think it's a little rough so I didn't want to use that. I went to another fabric store and asked the clerk what she would recommend and she showed me a more elastic, soft terry cloth. It was perfect. They were all sold out of white though so I got a sea foam green color and black. I think they turned out really cute. Once I got all of the supplies to make them, they were pretty simple.


Supplies needed:

  • square of fabric 7 1/2" x 10 1/2" for top of bib
  • square of fabric 8 1/2" x 11 1/2" for bottom of bib
  • square of chenille 16" x 11 1/2" for bib backing (I couldn't find chenille so I used terry cloth. You could get creative here on the back fabric. Minky would probably be cute and soft as well.)
  • lightweight fusible interfacing
  • thread
  • ribbon, ric rac, or trim of your choice (optional)
  • rotary cutter/mat/ruler
  • 2" piece of 1/2" velcro (I bought black to match the backing)
  • pattern from Sew She Sews
 I followed the tutorial from Lots of Pink Here The bib pattern from this tutorial was too large for my liking though. I followed her tutorial but I used the pattern from Sew She Sews

I bought fat quarters for the top of the bib. They worked great and then I'm not left with a bunch of leftover fabric. You could probably make 3 or 4 bibs out of two fat quarters.  


 I skipped the ric rac step on mine because I realized that I didn't have thread the same color. Sad, I know. I had been to the store so many times for this project that I felt like I just needed to finish them. I totally bought the wrong interfacing and had to go back to the store for that already. I hate when that happens. I  think they turned out really cute without the ric rac and I'm excited to make some more.


Thursday, October 24, 2013

Teriyaki Salmon

My husband isn't a  huge fan of how full I can get our freezer. It's always pretty stuffed. So, I decided to start using up a lot of the stuff that I have in there. I don't think it's the amount of stuff in there but there are so many odd shaped things that it doesn't fit together very well and things are always falling.

I had frozen rice and frozen salmon in the freezer that I decided to incorporate into a meal last night. It turned out delicious and was so easy! Easy meals are a must now with this little guy demanding all of my attention. I'm not complaining though. This little one is so much fun!

I got the recipe from Damn Delicious

Ingredients:
  • 1 tablespoon cornstarch
  • 1/4 cup soy sauce
  • 1/4 cup brown sugar, packed
  • 1/2 teaspoon ground ginger
  • 1/4 teaspoon garlic powder
  • 2 tablespoons honey 
  • 1 cup water
  • 2 salmon filets
  • Cooked rice, for serving
  • Sesame seeds, for garnish
  • Sliced green onions, for garnish 

Directions:

  • In a small saucepan over medium heat, add the soy sauce, brown sugar, ginger, garlic powder, honey and 1 cup water; bring to a simmer.
  • Stir in the cornstarch until thickened enough to coat the back of a spoon, about 2 minutes. Let cool to room temperature.
  • In a gallon size Ziploc bag or large bowl, combine the teriyaki marinade and salmon filets; marinate for at least 30 minutes to overnight, turning the bag occasionally. (Instead of using salmon filets I used a longer, thinner piece of salmon so I put it in a 9x13 baking dish, poured the teriyaki sauce on top, covered with saran wrap and let it marinade in there about an hour before baking. It turned out great!)
  • Preheat the oven to 400 degrees F. Lightly coat an 8×8 baking dish with nonstick spray.
  • Place the salmon filets along with the marinade onto the prepared baking dish and bake until the fish flakes easily with a fork, about 20 minutes.
  • Serve the salmon immediately with rice.

Sunday, October 20, 2013

Olive Garden Bread sticks

My sister came to visit us last week and we had a lot of fun! She was supposed to come in September for her birthday but I ended up having a baby the day before her flight was scheduled so we had to postpone it. She comes to visit every summer and I absolutely love it. I always have a long list of things I want to do with her when she comes. This year was a little different since I had a little one but we still got to do quite a bit of stuff. We love to cook together when she comes into town so one of the first things we made was homemade chicken broccoli Alfredo. It was absolutely delicious. We decided to make homemade Olive Garden bread sticks to go with it. They take a little bit of time to rise but the preparation is pretty easy. I got the recipe from Moms Crazy Cooking

Unfortunately I didn't get a picture of the finished product. They were so delicious. I will have to make them again soon and take final pictures of them before they are all gone. 

Ingredients:

2 tbsp granulated sugar
3/4 tsp active dry yeast
1 cup; plus 1 tbsp warm water (105-115 degrees)
3 cups bread flour
1-1/2 tsp salt
1/4 cup butter, softened

(use for topping after baking)
2 tbsp butter, melted
1/2 tsp garlic salt

Dissolve the sugar and yeast in the warm water in a small bowl or measuring cup and let the mixture sit for about 5 minutes, or until it becomes foamy on top. If it doesn't get foamy, check to make sure your yeast isn't expired or the water wasn't too hot or too cold. This step is called proofing. If the mixture doesn't get foamy that means that the yeast didn't activate and the bread won't rise if you continue on.

Combine flour and salt in a large bowl. Use the paddle attachment on your stand mixer to mix in the softened butter to the flour. Don't worry if it still looks like flour, you just don't want to see lumps of butter.

Switch to your dough hook and add your foamy yeast mixture to the flour. Combine ingredients and then knead for 10 minutes.

Transfer dough to a lightly greased bowl and cover with a damp towel, let rise for 1 to 1 1/2 hours, it will double in size.

Once doubled, measure out portions to roll into bread sticks. The easiest way to roll is between your palms but you can also roll on the counter or a cutting board.  Place dough on a parchment lined baking sheet, or Pam sprayed baking sheet.

Once all dough is rolled, cover with a damp cloth and let rise for another hour to 1 1/2 hours. Until the dough doubles in size again.


Preheat oven to 400 degrees. Bake the bread sticks  for 12-14 minutes till golden brown. Remove from oven and add the garlic salt to the melted butter and then brush it over the bread sticks.

Makes 12-13 bread sticks.


We dipped these bread sticks in homemade Alfredo which was delicious! If you want the recipe to homemade Alfredo sauce go here

Wednesday, October 9, 2013

Peanut Butter Bars

Last week one of our good friends came over to meet our new bundle of joy and she brought us some peanut butter bars. My husband is obsessed with peanut butter and these were so delicious! We ate them all in just a few days. Last night he wanted some more so I found a recipe online and we made some. They are so easy and delicious! This is my new go to dessert recipe. It only took about 10 mins to make and then about  40-50 minutes to set in the fridge. No baking necessary. Awesome, right? I love that all of the ingredients are things that I usually have on hand too. Five ingredients is all you need for a delicious peanut buttery goodness treat!

I got the recipe from JensFavoriteCookies


Ingredients:
1 1/4 cups peanut butter
1 cup butter
2 cups powdered sugar
2 cups crushed graham crackers
1 1/2 cups chocolate chips 

Directions:
1. In a bowl melt 1 cup butter with 1 cup peanut butter until melted. Add the graham cracker crumbs and powdered sugar to the melted butter and peanut butter mixture. Spread mixture evenly in a 9x13 pan. 

2. Melt the chocolate chips with 1/4 cup peanut butter in the microwave 30 seconds at a time until melted, stirring in between. In my microwave it only took one minute to completely melt the chocolate and peanut butter. 

3. Pour chocolate mixture over the bars, spreading evenly over the top. 

4. Chill 40-50 minutes until the chocolate sets.

Sunday, October 6, 2013

Steamed Lobster Tail


My husband went on a lobster trip with some of his cousins last year off Catalina Island. He brought back delicious scallops and lobster. We had eaten all of the scallops and lobster tails, except for two, soon after his return. As my husband and I were trying to decide what to do for our three year wedding anniversary this year and we decided to stay at home and celebrate with the last two lobster tails. I was going to be 36 weeks pregnant and since we had done big things the past two years to celebrate we were alright with doing something small.

Well, as some of you know, our little bundle of joy decided to come 4 weeks early on our wedding anniversary. Needless to say, we did not have lobster tail, instead we had a steak celebratory dinner at the hospital with a bottle of sparkling cider. It was so delicious after almost two days of eating nothing.

Well, two and a half weeks later we decided to make our lobster tails. They were delicious and easy. We decided to steam them instead of grill them this time and I liked them much better.

Ingredients: 
Lobster tail
Butter
Garlic

Directions:
Fill a pot half way with water. Bring to a boil and fit the top of the pot with a steam chamber, steam basket, or use a colander.

Place lobster tails in steam chamber, basket, or colander. Cover with lid.

Steam lobster tails for 5-7 minutes. I used a colander and some of the holes were not completely covered so I steamed our tails for 7 minutes and it was perfect. Remove the lobster tails from the steamer and rinse with cold water. There will be a grey, stringy film on the outside of the tails when you take them out, you can take this off under cold running water.

serving suggestions:
We enjoy our lobster tails with lemon garlic butter. We mix grated garlic and melted butter in a bowl and then brush it onto the lobster tails.


Saturday, September 28, 2013

Half White Half Wheat homemade bread

On Sunday night, two weeks ago, my husband wanted to make bread. Ever since he gave me my Bosch he wants to make bread with me all the time. I absolutely love it! It's so fun to be in the kitchen with him. We have made a few different types of bread now and I wanted to try something with wheat. We found this great recipe at Adventures in Bowersland. This recipe makes two large delicious loaves of bread. When we were baking these loaves we had to move the shelf down in the oven because they were touching the top when we checked on them.The great thing about wheat is it is very filling. One piece of toast and you feel full.


Ingredients:

4 cups whole wheat flour
4 cups white flour or bread flour
4 cups luke-warm water (115 degrees F)
1/3 cup honey
2 tsp active dry yeast
2 tsp sea salt
4 Tbsp butter
olive oil


Mix together 1 cup warm water with the honey and the yeast. Set it aside for about 10 minutes to activate. When the yeast mixture looks all bubbly, you know it is ready. In a large mixing bowl mix the yeast mixture with the other 3 cups of warm water and 4 cups of white or bread flour.  Add 1 cup of whole wheat flour and continue mixing. Stir until the lumps are all out and cover with a damp towel. Set it aside for 30 minutes. The dough will rise slightly.


While you wait melt the butter and set it aside. You want the butter to be cool before you add it to the mixture so it doesn't kill the yeast. Add the butter and salt to the mixture as well as the last 3 cups of whole wheat flour adding just a little at a time. Once you've mixed in all of the flour, roll the dough out onto a well floured surface or turn on med/high if mixing in your KitchenAid or Bosch. When the dough pulls off the side of the bowl you know it is ready. I ended up having to add about 2 cups more flour to get the dough the right consistency. You want to make sure it's not too sticky but you don't want to add too much flour or it will end up really dense. If kneading by hand, knead on a floured counter top for 10-15 minutes adding more flour as needed until it no longer sticks to the counter top. Once you are done kneading it, place some olive oil in a large mixing bowl and put the dough back into the bowl. Put a dash of olive oil on top of the dough and turn it a few times to cover it in oil. Place a damp towel over the bowl and let it rise for about an hour or until it is double in size.

Once it has risen, you can punch the center of the dough ball to get out all of the air bubbles. Cut the dough into two pieces and roll each piece out either on the counter top or in your hands to get the rest of the air bubbles out. Then, shape your dough balls into loaves. Place the dough balls into two greased bread pans. Cover the bread pans with a damp towel again and let it rise for 30-45 minutes. This is the last time, I promise!


Preheat your oven to 350 degrees while the dough is rising in the loaf pans. The dough should almost double in size. Bake for about 40 minutes or longer if you want a darker crust.


When the bread comes out of the oven, place the loaves on a cooling rack. I like to put mine on the side and then the cooling rack makes lines in the bread and they make perfect slices if you cut along them.

On a side note, the day after we baked this bread my water broke and our little baby decided that it was time to come. He came 4 weeks early. When we got home from the hospital 4 days later everything in our fridge was old and spoiled so this bread was awesome to have. We had amazing friends and family who helped us out with meals, cleaning, diapers, premie clothing, etc. I can't thank them enough! We love this new little bundle of joy!

Monday, September 9, 2013

Whole Chicken in Crockpt

This is one of my favorite Sunday recipes. Anything in the crockpot is easy but this one takes about 3 minutes to prepare. There is nothing to chop, unless you want to add vegetables to it.

Ingredients:
1 small whole chicken- (make sure it fits in the crockpot and you can still put the lid on)
Lawry's seasoned salt
pepper
1 cup water

place three small tin foil balls in the bottom of the crockpot. Pour 1 cup water into the crockpot. Season the chicken with Lawry's seasoned salt and pepper. Place chicken on top of tin foil balls. Cook on low for 8-10 hours. I can promise you that this chicken will be close to the most tender chicken you've ever had in your life, if not the most tender. It just falls apart. It makes a great dinner and great leftovers. Sometimes I'll shred the chicken and freeze it or use it for enchiladas the next day. It's also nice to save the water at the bottom of the crockpot. It makes for a great chicken broth. I would just strain out any chicken pieces that are left in it.

I added corn and a side salad to it to make a complete meal. We had a great meal that only took probably 10 minutes total. These kinds of dinners are my favorite! If you decide to try it let me know how your chicken turns out!

Wednesday, September 4, 2013

Crocheted Hot Pads

A friend of mine gave me crocheted hot pads for Christmas last year and I have absolutely loved them. They are so cute and they are perfect for putting on the kitchen table underneath hot pans or dishes. I have been wanting to learn how to make them for quite some time now but my friend and I just haven't had the time to get together. Finally on Labor day I decided to go to Michael's and at least pick up the supplies. Once I got home, since Tyrone was still out of town I thought, I bet I could just teach myself. So, lo and behold I went to youtube. I have looked at multiple blogs but not knowing much about crocheting I didn't really understand much. I found a video on youtube that was perfect for me and my skill level. In order to be able to follow the video you do have to know how to do a basic crochet stitch. If you know how to do that, it's pretty simple to follow along.
What you will need: 
One ball of this sugar 'n cream yarn ( it will  make one hot pad.) Look for worsted weight, cotton yard if you can't find or don't like this brand. 
a size G crochet hook
1 tapestry needle to finish off the end of the hot pad 

They've got all sorts of fun colors at the store to choose from. It was really hard to pick. My hot pad turned out looking like it was made for Easter. I think I'll do some more neutral colors next time, but I'm pretty proud of it so I'm going to use it anyway.


Here are a few videos to start with if you are new to crocheting all together. Even if you have never done it before, I promise you it's possible. The main video skips some of these basics, so watch these first two videos if you need to and then go onto the hot pad tutorial.


This is a video on how to start your original chain. If you need help making your slip not, watch the final hot pad tutorial video. She goes through some things kind of fast but you can see how she does the knot.


Here is a good video tutorial for the single crochet stitch. You will use this after you finish your original chain.


Lastly, here is the video I watched to learn how to make the complete hot pad.


I hope you are able to follow along. Let me know if you try it and how yours turn out! Good luck!


Tuesday, September 3, 2013

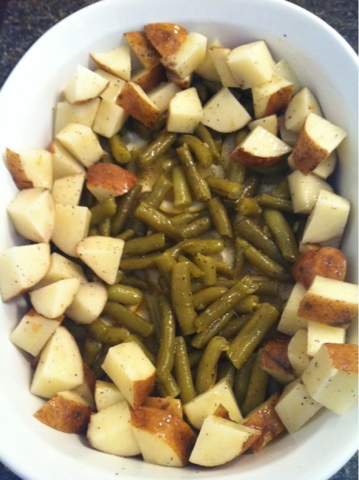
Pan Roasted Chicken with Lemon Garlic Green Beans

I kid you not this is one of the best dishes I think I have ever made. It is seriously to die for! It's pretty simple too which I love. This is one of those meals I can make around lunch time and then stick in the fridge until my husband's headed home from work and then I just throw it in the oven and dinner is ready when he gets home. Although when I texted my husband today to see when he would be home, he said he had a work meeting and wouldn't be home until late so I ate this dish all by myself and loved it! I sure wasn't feeling guilty about going back for seconds!

I hope you guys enjoy this recipe as much as I did. I was worried that it wouldn't have enough flavor but that is definitely not a problem. I'm not sure if it's because I made it ahead of time and let it marinade in the lemon for a few hours before I cooked it, but it was full of flavor!

I got  the recipe from Real Simple
Ingredients:
  • 6 tablespoons olive oil
  • 2 lemons, 1 thinly sliced, 1 juiced
  • 4 cloves garlic, minced
  • 1 teaspoon kosher salt
  • 1/2 teaspoon freshly ground black pepper
  • 3/4 pound trimmed green beans (I used a can because it was all I had)
  • 8 small red potatoes, quartered (I used 3 regular potatoes)
  • 4 chicken breasts (bones left in, with skin, about 3 1/4 pounds) (I used 2 breasts and 3 legs) 
  • Directions

    1. Preheat oven to 450°F. Coat a large baking dish or cast-iron skillet with 1 tablespoon of the olive oil. Arrange the lemon slices in a single layer in the bottom of the dish or skillet.
    2. In a large bowl, combine the remaining oil, lemon juice, garlic, salt, and pepper; add the green beans and toss to coat. Using a slotted spoon or tongs, remove the green beans and arrange them on top of the lemon slices. Add the potatoes to the same olive-oil mixture and toss to coat. Using a slotted spoon or tongs, arrange the potatoes along the inside edge of the dish or skillet on top of the green beans. Place the chicken in the same bowl with the olive-oil mixture and coat thoroughly. Place the chicken, skin-side up, in the dish or skillet. Pour any of the remaining olive-oil mixture over the chicken.
    3. Roast for 50 minutes. Remove the chicken from the dish or skillet. Place the beans and potatoes back in oven for 10 minutes more or until the potatoes are tender. Place a chicken breast on each of 4 serving plates; divide the green beans and potatoes equally. Serve warm.   (I baked mine for 50 minutes and the potatoes were already tender so I didn't have to bake for another 10 minutes. I don't know if I could have waited any longer to eat it anyway, the lemon chicken aroma coming from the oven was making my stomach growl.)
     

Monday, September 2, 2013

Cinnamon Raisin Bread

Tyrone has been out of town a lot lately and our home feels so lonely without him. Now, there are countless things that I should be doing. With him being gone you would think I'd get a lot accomplished but that hasn't seemed to be the case. Last week he was out of town 5 days for work and the whole week I just lounged around the house relaxed and didn't do a whole lot. Tyrone left out of town again a few days ago to go on a trip with some of his college buddies and the first night he was gone I was on Facebook and his friend's wife, Ellen, said that with her husband gone she had already cleaned the whole house! She was my inspiration. I decided it was time to be productive. I first cleaned the house and organized quite a few things for the baby. Yesterday I worked half a day and ran errands. Then today I baked homemade cinnamon raisin bread. I feel like that's much better than last time he went out of town. Plus, I worked on Saturday and I'm working on the holiday tomorrow so that's got to count for something right?

Now, as I mentioned on my birthday post, Tyrone got me a Bosch mixer for my birthday a few weeks ago and I absolutely love it! Baking bread is much simpler now and it isn't nearly as big of a task as it used to be. I came across a recipe that makes three loaves of cinnamon raisin bread which is perfect because for one, I only have 3 loaf pans and secondly, I have two friends I wanted to take loafs to and then that leaves me with a loaf for Tyrone and I. Using this recipe in the Bosch is awesome because its bigger than a kitchen aid mixer and it can handle a lot of dough. With the kitchen aid mixer, once you add most of the flour you might have to knead it on the table to make it smooth at the end because the mixing bowl will be too full.


Here is the recipe from Super Glue Mom

Ingredients:
  • 1½ cups milk
  • 1 cup warm water (between 110-115 degrees)
  • 5 teaspoons active dry yeast
  • 3 eggs
  • ½ cup white sugar
  • 1 teaspoon salt
  • ½ cup unsalted butter, softened
  • 1 cup raisins
  • 9 cups all-purpose flour + more for kneading
  • 2 tablespoons milk
  • 1 cup white sugar
  • 3 tablespoons ground cinnamon
  • 2 tablespoons butter, melted (approx.)
  • 3 9×5 inch loaf pans
    Instructions:
  • Warm milk (in the microwave or stovetop) to a luke-warm temperature (120-125 degrees).
  • Dissolve yeast in warm water and set aside until yeast is frothy, about 10 minutes or so.
  • In the bowl of your stand mixer (or a large bowl) add in eggs, sugar, butter salt and raisins. Next, add milk and yeast mixture as well as the water.
  • Add the flour gradually to make a dough. (Mine only took just over 8 cups. I would start with 8 and slowly add up to 9 as needed. In the mixer I watch for when the dough starts to pull away from the sides of the bowl leaving the sides of the bowl clean.)
  • On a lightly floured surface, knead the dough for a few minutes until smooth. I usually finish my dough on the counter since my stand mixer is not a huge one and it tends to overfill. (Because I had the Bosch mixer I was able to use the dough hook and just knead it with the hook in the bowl for a few minutes until the dough was smooth.)
  • Place dough in a large, buttered, mixing bowl and turn to grease the surface of the dough.
  • Cover with a warm, damp cloth and let rise. I usually turn my oven on for a couple of minutes while I am mixing the ingredients, turn oven off and let my dough rise in there. It’s warm enough but not hot that it will cook it. (It has been so hot here lately that my dough doubled in size without using the oven in only 40 minutes.)
  • Allow to rise until doubled, usually about 1½ hours.


  • Roll out on a lightly floured surface into a large rectangle ½ inch thick.

  • Moisten the dough with 2 tablespoons milk and rub all over the dough with your hands.

  • Mix together 1 cup of sugar and 3 tablespoons cinnamon and sprinkle mixture evenly on top of the moistened dough.
  • Roll up tightly (the long way). The roll should be about 3 inches in diameter.

  • Cut into thirds, and tuck under ends and pinch bottom together. (I use thread to cut the loaves into three even pieces. This is the same technique I use when cutting cinnamon rolls. (I also cut off the very ends of the long rolls to make the ends look better and fit into the pan easier.)
  • Place loaves into 3 well greased 9 x 5 inch pans and lightly grease tops of loaves.

  • Let rise in warm place, uncovered, again for about an hour.


  • Bake at 350 degrees for 45 minutes or until loaves are lightly browned and sound hollow when tapped.
  • Remove from oven and let cool on rack. Take melted butter and spread over tops of loaves (totally optional).
  • After about 20 minutes, lay loaves on their sides and remove from pans. Allow loaves to cool before slicing.

  • I bake all 3 loaves at once, cool and slice. I freeze 2 of them for later use.